
Integrating Razorpay in a MERN Application — Full Flow with Webhooks

A complete, developer-friendly walkthrough on integrating Razorpay with the MERN stack. This guide covers creating orders, handling payments on the frontend, verifying signatures on the backend, and implementing reliable webhooks for real-world applications like crowdfunding platforms, digital stores, and SaaS products.
Payment integration is one of the most sensitive and important parts of any production-level web application. Whether it’s a donation platform, an e-commerce store, or a digital marketplace, you need something fast, secure, and reliable.
Razorpay fits perfectly in the Indian ecosystem — it’s developer-friendly, beautifully documented, and supports features like UPI, Cards, Wallets, Subscriptions, and Webhooks.
In this blog, I’ll walk you through a clean, production-ready Razorpay integration in MERN, including:
- Creating an order on the backend
- Initiating payment in React
- Verifying payment signatures
- Implementing robust webhooks
- Handling real-world reliability issues
1. Setting Up Razorpay on the Backend (Node.js + Express)
Install the SDK:
npm install razorpay
Create a Razorpay instance:
import Razorpay from "razorpay";

export const razorpayInstance = new Razorpay({
  key_id: process.env.RAZORPAY_KEY_ID!,
  key_secret: process.env.RAZORPAY_KEY_SECRET!,
});
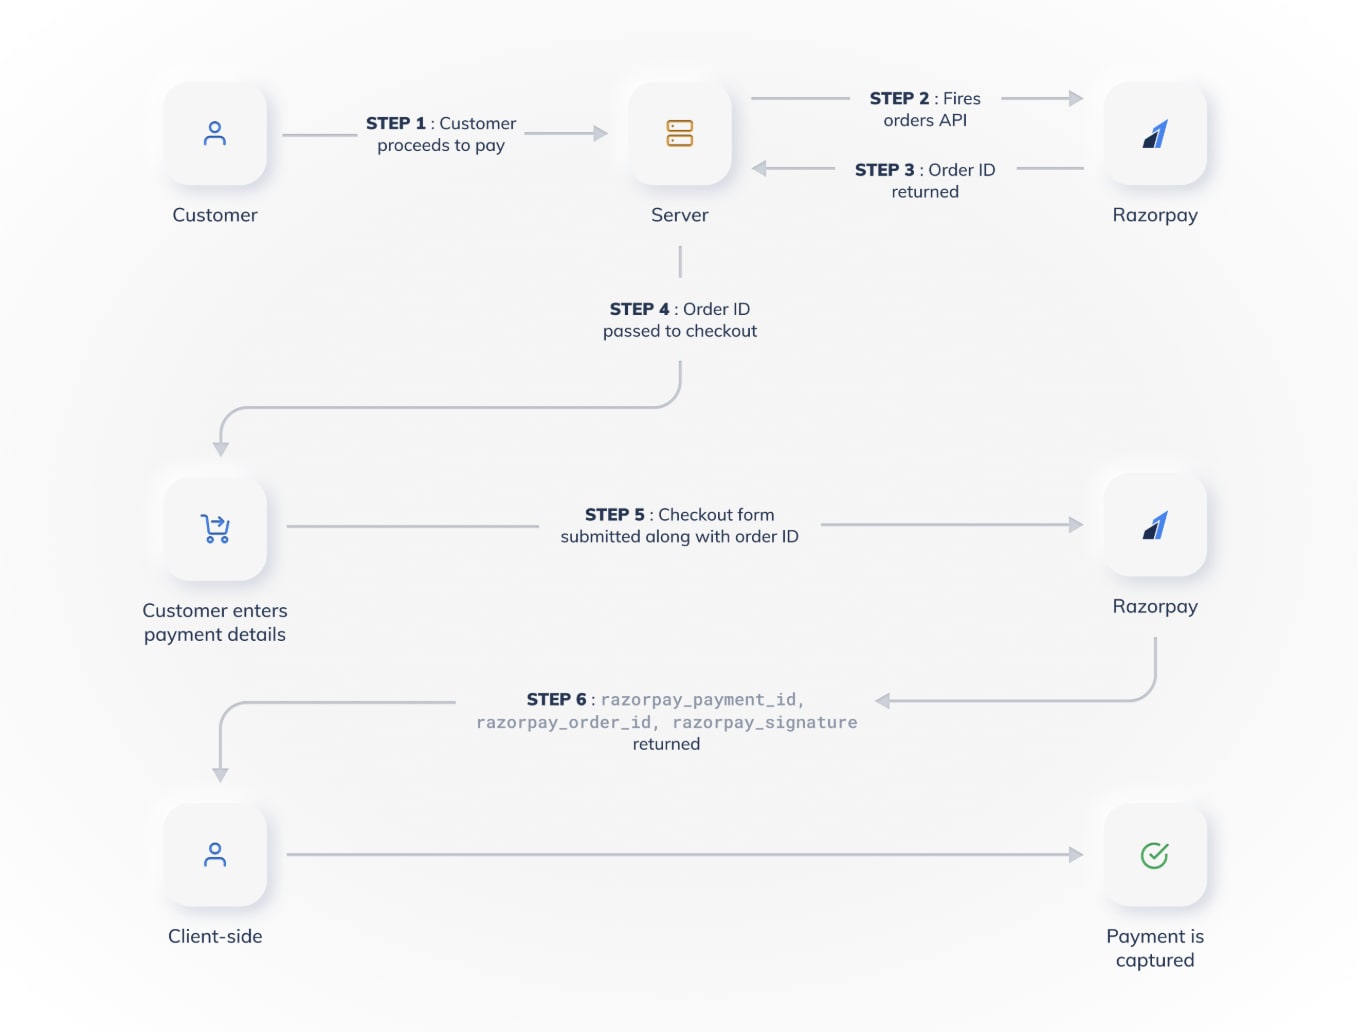
Creating Orders
Your client will request an order before initiating checkout.
// POST /create-order
export const createOrder = async (req, res) => {
  try {
    const { amount } = req.body;

    const options = {
      amount: amount * 100, // in paise
      currency: "INR",
      receipt: "receipt_" + Date.now(),
    };

    const order = await razorpayInstance.orders.create(options);

    res.status(200).json({ order });
  } catch (error) {
    res.status(500).json({ message: "Order creation failed" });
  }
};
This returns an order ID that the frontend needs for checkout.
2. Implementing Razorpay Checkout on the Frontend (React)
Load the Razorpay script
const loadScript = (src) => {
  return new Promise((resolve) => {
    const script = document.createElement("script");
    script.src = src;
    script.onload = () => resolve(true);
    script.onerror = () => resolve(false);
    document.body.appendChild(script);
  });
};
Initiate payment
const startPayment = async () => {
  const res = await axios.post("/api/create-order", { amount: 500 });

  const loaded = await loadScript("https://checkout.razorpay.com/v1/checkout.js");
  if (!loaded) return alert("Failed to load payment SDK");

  const options = {
    key: import.meta.env.VITE_RAZORPAY_KEY_ID,
    amount: res.data.order.amount,
    currency: "INR",
    order_id: res.data.order.id,
    name: "My App",
    handler: async function (response) {
      await axios.post("/api/verify", response);
    },
  };

  new window.Razorpay(options).open();
};
Once payment completes, Razorpay sends back:
razorpay_payment_idrazorpay_order_idrazorpay_signature

3. Verifying Payment Signature (Backend)
Signature hashing ensures that the payment wasn’t forged.
import crypto from "crypto";

export const verifyPayment = async (req, res) => {
  const { razorpay_order_id, razorpay_payment_id, razorpay_signature } = req.body;

  const sign = razorpay_order_id + "|" + razorpay_payment_id;
  const expectedSign = crypto
    .createHmac("sha256", process.env.RAZORPAY_KEY_SECRET!)
    .update(sign)
    .digest("hex");

  if (razorpay_signature === expectedSign) {
    return res.status(200).json({ message: "Payment verified successfully" });
  } else {
    return res.status(400).json({ message: "Invalid signature" });
  }
};
This step is mandatory before confirming an order.
4. Implementing Webhooks (The Most Important Part)
Webhooks ensure you never lose a payment even if:
- User closes the tab
- Network fails
- Frontend never receives the response
- Server restarts during payment
Razorpay sends events like:
payment.capturedpayment.failedorder.paid
Verify webhook signature
Razorpay signs the request using X-Razorpay-Signature.
export const handleWebhook = async (req, res) => {
  const webhookSecret = process.env.RAZORPAY_WEBHOOK_SECRET!;
  const receivedSign = req.headers["x-razorpay-signature"];

  const expectedSign = crypto
    .createHmac("sha256", webhookSecret)
    .update(JSON.stringify(req.body))
    .digest("hex");

  if (receivedSign !== expectedSign) {
    return res.status(400).send("Invalid webhook signature");
  }

  // Process event
  const event = req.body.event;

  if (event === "payment.captured") {
    // Update donation/purchase in DB
  }

  res.status(200).json({ status: "ok" });
};
Important:
Use express.raw({ type: "application/json" }) for this route so Razorpay can validate the body.
5. Best Practices for Production
✔ Always rely on webhooks, not frontend confirmation
The frontend handler is nice, but webhooks are truth.
✔ Store every event in a logs table
Great for debugging and auditing.
✔ Never mark a payment as successful until webhook confirms it
This prevents fraud.
✔ Use retry logic for failed webhook processing
Razorpay retries automatically, but your server should handle duplicates gracefully.
Final Thoughts
Integrating Razorpay into a MERN application becomes smooth once you understand the order → checkout → signature verification → webhook cycle. With the webhook in place, you make the payment system robust enough for real-world apps like e-commerce, digital products, donation platforms, or subscription-based services.